How to Knit a Butterfly
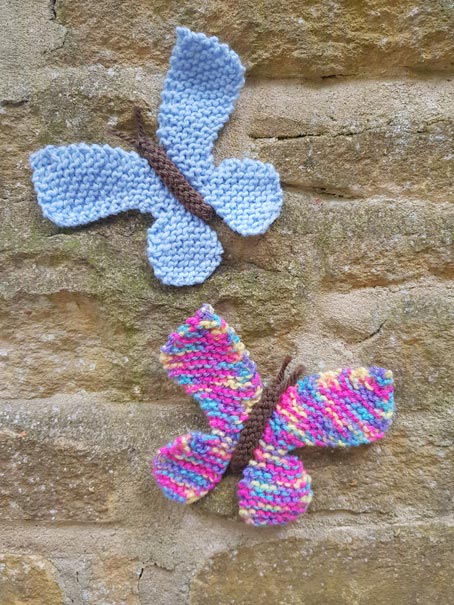
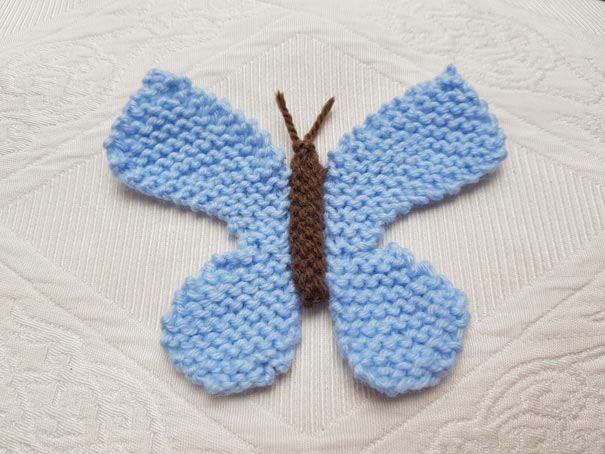
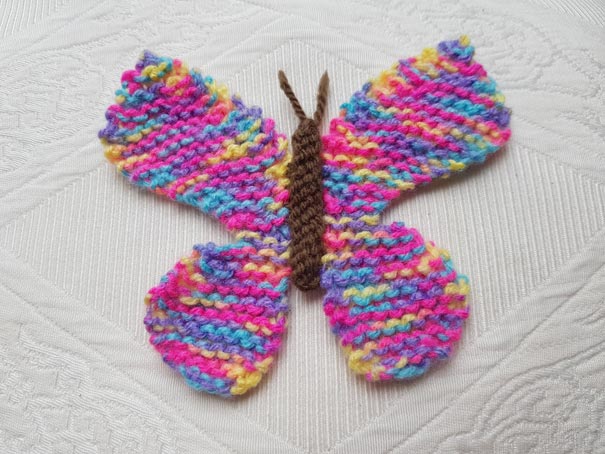
Complete Size – 12.5cm width x 11cm height
What you will need…
Total time – 1 Hour 30 Minutes Each Knitted Butterfly
3.25mm knitting needles (UK 10, US 3)
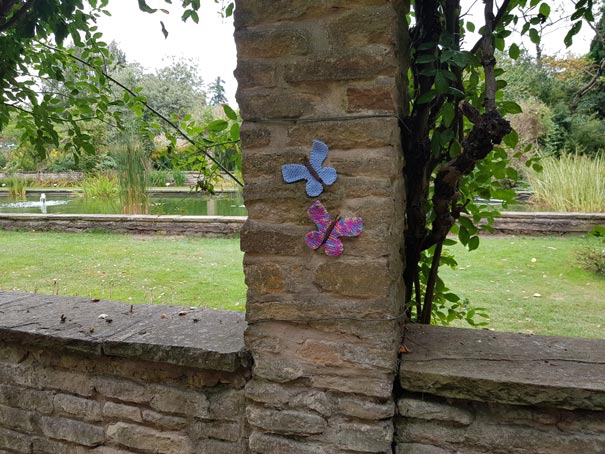
Double knitting yarn – Colours according to preference. The pictured butterflies require light blue or multicoloured yarn, and medium brown.
Sewing up needle
Scissors
No toy filling/stuffing is required.

Before You Start…
Abbreviations
K = Knit P = Purl St = Stitch Sts = Stitches
Cast On – I use the thumb method.
K2tog = Decrease by knitting two stitches together, making one stitch from two.
Inc = Increase – by knitting into the front and the back of the same stitch, to make two stitches out of one.
Sl2tog – Slip two stitches together from the left needle to the right.
p2sso – pass two slipped stitches over (over the knitted stitch).
Cast off – K wise or P wise according to pattern. US – bind off.
TOP TIPS
If you use a multicoloured yarn, see if there is a repeating colour pattern – if so, try and start at the same point/colour along the length of yarn. This will allow each wing to be more symmetrical. Tension differences, however, may also add to the asymmetry of the wings – even after several attempts my wings all still seem to look different!
Take note of the loose end from the cast-on row, as knowing on which side this falls, will help you to realise which side of the pattern you are on if you lose your way in the pattern.
How to Make it…
Made from two knitted wing pieces, one knitted body piece and the option of one finger-knitted length to make up both of the antennae. All pieces are sewn together, with optional added stitching to the wings for personalisation or added prettiness.
Wing Piece

Make 2 for each Butterfly
Time – 30 Minutes each Piece
Piece Size – 5 cm (width) x 11 cm (height)
Needles 3.25 mm
Yarn light blue (or as desired for Butterfly wing colour)
Begin at bottom of wing and cast on 5sts
Next row K
Next row Inc Kwise, K2, inc Kwise, K1 (7sts)
K 1 row
Next row Inc Kwise, K6 (8sts)
K 1 row
Next row Inc Kwise, K7 (9sts)
G-st 3 rows
Next row K1, K2tog, K6 (8sts)
Next row K
Next row K1, K2tog, K5 (7sts)
Next row K
Next row K1, K2tog, K4 (6sts)
Next row K
Next row cast off 3 sts, K to end (3sts)
Next row K
Next row Inc Kwise, K2 (4sts)
Next row K
Next row Inc Kwise, K3 (5sts)
Next row K
Next row Inc Kwise, K1, K2tog, K1 (5sts)
Next row K
Next row Inc Kwise, K4 (6sts)
Next row K
Next row Inc Kwise, K1, Inc Kwise, K3 (8sts)
Next row K
Next row Inc Kwise, K1, Inc Kwise, K5 (10sts)
Next row K
Next row Inc Kwise, K1, Inc Kwise, K4, K2tog, K1 (11sts)
Next row K
Next row Inc Kwise, K7, K2tog, K1 (11sts)
Next row K
Next row Inc Kwise, K7, K2tog, K1 (11sts)
Next row K
Next row Inc Kwise, K7, K2tog, K1 (11sts)
Next row K
Next row K1, K2tog, K5, K2tog, K1 (9sts)
Next row K
Next row K1, K2tog, K3, K2tog, K1 (7sts)
Next row K
Next row K1, K2tog, K1, K2tog, K1 (5sts)
Next row K
Next row K2tog, K1, K2tog (3sts)
Next row K
sl2tog, K1, p2sso
Body Piece

Make 1 for each butterfly
Time – 5 Minutes each piece
Piece Size 5 cm width x 1.5 cm height
Needles 3.25 mm
Yarn Medium Brown
Cast on 12sts
Beginning with a P row, st-st 3 rows
Cast off
Piece it Together…
Sewing-up time – 20 Minutes

Making up the Body – With the wrong side of st-st on the outside, roll the cast-off edge of the body piece over towards the cast-on edge and oversew these stitches together, along its length as shown above. No stuffing is required due to its compact shape. Ensure the row ends are also oversewn, and when fastening off, leave two small lengths of yarn poking out of the top, evenly on either side, to form the two antennae. (This is the quick way to form the antennae, but finger knitted lengths may be made and sewn on instead, but this is not added to the pattern timing – See Make it Different below for further information.)


Completing Your Butterfly – With both wing pieces completed, flip one over to have a left wing and a right wing as per above. Fasten off loose ends of the wings on the wrong side of the butterfly for a neater finish. I find threading the loose end along a knitted row also allows a neat finish from the reverse side of your butterfly.


Turning your wing pieces and body piece over to see the reverse sides, place the two straighter edges of the butterfly wings on each side of the completed body, leaving a roughly equal amount of body poking out above and below the wings. Pinning in place may help to keep it less fiddly. Sew the wings securely from the back of the butterfly, just adjacent to the sewn seam of the body.

Once one wing is sewn, folding the wings back towards one another may also make it easier to sew the second wing and ensure the symmetry of wing placement. Ensure all pins are removed when complete. Fasten off all loose ends, turn over and enjoy!

Make it Different…
Instead of leaving long ends of yarn to form the antennae, you may wish to spend a little more time and finger knit a single length of yarn instead. The example below started as a 5 cm finger-knitted total length but this may vary according to the species of butterfly or your preference. Fold this length in the centre to create two antennae as shown and sew this centre point to the top of the body piece.

You may of course leave the butterflies simple as they are, but you may also wish to add some decorative spots or patterns. Take a look at the little Christmas tree for other ideas on how to decorate your butterfly. Using butterfly images or some garden inspiration, you could even follow a natural design and colouring to represent a particular species.
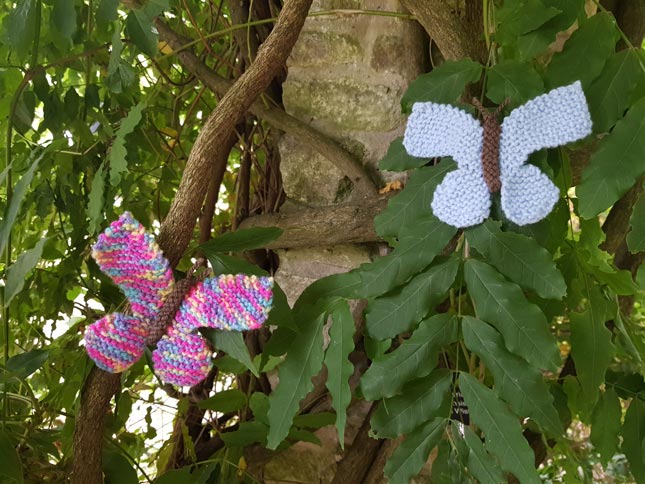
Yes, so as with many of my other patterns, they can also be sewn onto a hairband (I’m going to end up with the best-decorated 5 year-old at this rate!) But as they are fairly small and flexible, these knitted butterflies make great little portable keepsakes. Alternatively, they can be sewn onto other materials directly such as a blanket or cushion, or even hung around on some added finger-knitted loops to cheer up the home or furniture. They may also be combined with flowers, such as the knitted daisy, knitted daffodil, knitted poppy and knitted fuchsia, to make a nice little knitted picture, similar to the space scene picture I made for my other nephew when he was born!
Behind the Scenes!
These patterns are all made up as I go along, learning from mistakes along the way. Every time I create a new pattern, I record it in the Updates part of this site (effectively my blog…) There is a story behind each creation, and this can help give you some more ideas and encouragement. See the Update info….
All done?
Feel free to share your successes or any other tips or suggestions by contacting me. If it’s all gone swimmingly and you’re ready for your next challenge, have a look at what to try next! My next pattern!