How to Knit a Christmas Tree
Complete Size – 8cm width x 15cm height
What you will need…
Total time – 2 Hours 40 Minutes Each Knitted Christmas Tree
3.25mm knitting needles (UK 10, US 3)
Double knitting yarn – Colours according to preference. Pictured tree requires green, bright blue, royal blue, brown and sparkly silver.
Sewing up needle
Scissors
Toy filling/stuffing

Before You Start…
Abbreviations
K = Knit P = Purl St = Stitch Sts = Stitches
Cast On – I use the thumb method.
St-st = stocking stitch. Alternating a row of knit stitches (right side), with a row of purl stitches (wrong side).
Inc = Increase – by knitting into the front and the back of the same stitch, to make two stitches out of one.
Cast off – K wise or P wise according to pattern. US – bind off.

TOP TIP
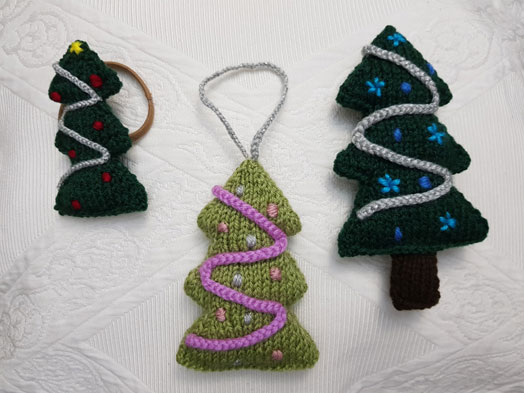
Choose any colour tree as per your preference, including varying shades of green or even a white version. Take a look at the Little Knitted Christmas Tree for other ideas on how to decorate your tree, or also have a go at that smaller one as part of your set, or for smaller purposes such as a hair accessory.

How to Make it…
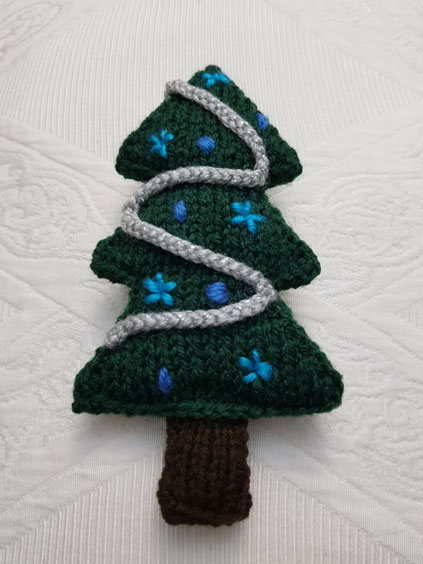
Made from two knitted main pieces, two small knitted tree trunk pieces and one finger-knitted length to make up the tinsel. All pieces are sewn together and stuffed, with added stitching for the stars and baubles.
Main Piece

Make 2
Time – 45 Minutes
Piece Size 8 cm (width) x 12 cm (height)
Needles 3.25 mm
Yarn Green
Beginning at the top of the tree, cast on 2sts
P 1 row
Next row Inc Kwise into every st (4sts)
P 1 row
Next row Inc Kwise, K1, Inc Kwise, K1 (6sts)
P 1 row
Next row Inc Kwise, K3, Inc Kwise, K1 (8sts)
P 1 row
Next row Inc Kwise, K5, Inc Kwise, K1 (10sts)
P 1 row
Next row Inc Kwise, K7, Inc Kwise, K1 (12sts)
P 1 row
Next row Inc Kwise, K9, Inc Kwise, K1 (14sts)
P 1 row
Next row Inc Kwise, K11, Inc Kwise, K1 (16sts)
Cast off 4sts Pwise, P to end (12sts)
Cast off 4sts Kwise, K to end (8sts)
P 1 row
Next row Inc Kwise, K5, Inc Kwise, K1 (10sts)
P 1 row
Next row Inc Kwise, K7, Inc Kwise, K1 (12sts)
P 1 row
Next row Inc Kwise, K9, Inc Kwise, K1 (14sts)
P 1 row
Next row Inc Kwise, K11, Inc Kwise, K1 (16sts)
P 1 row
Next row Inc Kwise, K13, Inc Kwise, K1 (18sts)
Cast off 4sts Pwise, P to end (14sts)
Cast off 4sts Kwise, K to end (10sts)
P 1 row
Next row Inc Kwise, K7, Inc Kwise, K1 (12sts)
P 1 row
Next row Inc Kwise, K9, Inc Kwise, K1 (14sts)
P 1 row
Next row Inc Kwise, K11, Inc Kwise, K1 (16sts)
P 1 row
Next row Inc Kwise, K13, Inc Kwise, K1 (18sts)
P 1 row
Next row Inc Kwise, K15, Inc Kwise, K1 (20sts)
P 1 row
Cast off
Tree Trunk Piece

Make 2
Time – 5 Minutes each piece
Piece Size 2 cm x 3 cm
Needles 3.25 mm
Yarn Brown
Cast on 6sts
Beginning with a K row, st-st 8 rows
Cast off
Tinsel
Knitting time – 10 Minutes as shown

Tinsel Piece – Using two strands of yarn together to make a thicker tinsel, finger-knit a length approximately 22 cm long.
Adding Decorations
Sewing time – 40 Minutes as shown

Tinsel – Starting from the top of the tree, first catch one end of the finger-knitted length to the desired position (see picture for guidance). Pass the tinsel across the front of the tree towards the opposite edge. Working from the back of your piece (for a neater finish), catch the tinsel at the edge of your main tree piece. Pass the tinsel across the front of the tree again and repeat the process as you work down the tree. There is no need to sew along the whole length of the tinsel, simply catching it at the edges like this makes the tinsel move more freely and gives a better finish.
Stars & Baubles – These are added before the knitted pieces of the tree are all sewn together as it allows a neater finish with hidden fastenings. Using desired colour of yarn, loop through 1 or 2 of the knitted stitches several times to make a bauble. To form the star at the top of the tree, start from a centre point and sew the yarn over at least 1 knitted stitch away, looping back to the centre. Doing this 5 times in different directions results in the star shape. Fasten off loose ends on the wrong side of st-st.
Piece it Together…
Sewing-up time – 10 Minutes as shown

Tree Trunk – Place the wrong side of st-st of the trunk in line with the wrong side of st-st of one of the main tree pieces. You may choose which way round you would like your trunk piece to be. I have chosen my cast-off edge to be at the bottom (effectively sewn on upside down) as this has a nice finished edge. You may also wish to pin it into place before sewing to ensure the position remains central. The top end of the trunk is oversewn to the back of the main piece as shown. Repeat this process for the second tree trunk piece, sewing onto the second main tree piece.

Complete your Piece – Place wrong sides together and oversew row ends down both sides of the tree, stuffing lightly as you go. Continue to oversew row ends of the trunk and finally the cast-off edge of the trunk, ensuring a small amount of stuffing is also placed inside the trunk. Fasten off loose ends. Ensure that if any pins are used, that they are all removed when complete.
Make it Different…
As well as using your choice for colour, style, stars, baubles, and tinsel, you can personalise it further by adding it to a hairband or headband for a hair accessory. It may also have a finger-knitted length sewn to the top to make a Christmas tree decoration (I found that 16cm long using a single length of yarn was just about right), or leave as it is plain to make a little toy, which may fit in perfectly to use in a doll’s house.
And don’t forget this Christmas tree can be made as part of a collection with the smaller Little Knitted Christmas Tree. You may also wish to check that page out for further decoration ideas.

Behind the Scenes!
These patterns are all made up as I go along, learning from mistakes along the way. Every time I create a new pattern, I record it in the Updates part of this site (effectively my blog…) There is a story behind each creation, and this can help give you some more ideas and encouragement. See the Update info….
All done?
Feel free to share your successes or any other tips or suggestions by contacting me. If it’s all gone swimmingly and you’re ready for your next challenge, have a look at what to try next! My next pattern!