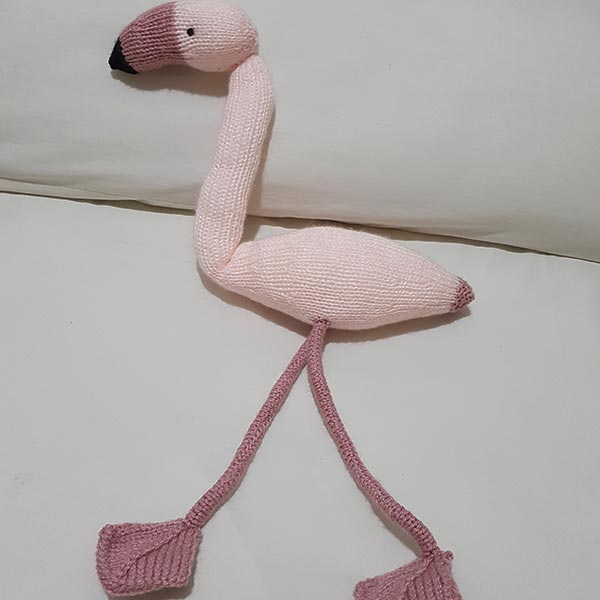
Knitted Large Flamingo

How to Knit a Flamingo
Complete Size – 22cm body length x 10cm body width x 60cm height (including legs)
What you will need…
Total time – 7 Hours Each Knitted Flamingo
3.25mm knitting needles (UK 10, US 3)
Double knitting yarn – Colours according to preference for flamingo type
Greater flamingo – light pink, dark pink, black. (As shown in this pattern.)
Chilean flamingo – light pink, grey, dark pink, cream, black.
Flamingo babies – grey, light pink, black.
Sewing up needle
Scissors
Toy filling/stuffing
Before You Start…
Abbreviations
K = Knit P = Purl St = Stitch Sts = Stitches
Cast On – I use the thumb method.
St-st = stocking stitch. Alternating a row of knit stitches (right side), with a row of purl stitches (wrong side).
K2tog = Decrease by knitting two stitches together, making one stitch from two.
Inc = Increase – by knitting into the front and the back of the same stitch, to make two stitches out of one.
Sl2tog – Slip two stitches together from the left needle to the right.
p2sso – pass two slipped stitches over (over the knitted stitch).
Cast off – K wise or P wise according to pattern. US – bind off.
B&T tightly – Using sewing up needle, thread yarn through all remaining stitches.
TOP TIP
If knitting for a child, I suggest using the greater flamingo colours or you are otherwise at risk of being told that it’s not a proper flamingo. Also take a look at the little flamingo pattern if you want it slightly smaller and quicker, and a bit less dingly dangly.

How to Make it…
Made from one knitted body and neck piece, one head and beak piece, two knitted leg pieces, and four small knitted pieces to make up the two feet. All pieces are sewn together and stuffed, with added stitching for the eyes.
** PDF Download Now Available! **
Add to Basket or Click on Link in Ravelry to buy now…

Benefits of PDF Downloads!
- No endless scrolling! Compact pattern can be seen more easily over a clear three-column arrangement.
- Standard easy-read font
- Download your favourites – Add them to your own personal folder to locate quickly and easily.
- Avoid any internet connection issues – download and knit wherever you like!
Printer-friendly Easy Print…
- No screen glare or eye strain.
- Mark where you get up to, to more easily carry on from where you left off.
- Colourful front page with pictured finished item, then black and white text-only – be kind to our planet, only print the pages you need!
Want to Start Knitting a Flamingo?
Download the Large Flamingo Knitting Pattern PDF
‘Progress in Pictures’ short video of items being made can now also be seen on my NEW YouTube Channel!! See – https://www.youtube.com/@Fittinginknitting
Body & Neck Piece
Make 1
Time – 2 Hours 30 Minutes Each Piece
Piece Size – 25 cm (width) x 40 cm (length)
Needles 3.25 mm
Head & Beak Piece
Make 1
Time – 1 Hour 10 Minutes Each Piece
Piece Size 11 cm x 13 cm
Needles 3.25 mm
Legs
Make 2
Time – 30 Minutes Each
Piece Size – 22 cm (width) x 3 cm (height)
Needles 3.25 mm
Feet
Make 4 (two for each foot)
Time – 20 Minutes Each
Piece Size 6 cm x 6 cm
Needles 3.25 mm
Piece it Together…
Sewing-up time – 70 Minutes as shown
Sewing Up
Body & Neck Piece – With right side of stocking-stitch on the outside, fold the cast-on edge to bring row ends together, catching the row ends to the centre of the cast-on edge. Oversew this cast-on edge and then the row ends, working along the body in mattress stitch for a neater finish. Stuff lightly with toy filling as you move along. Leave the cast-off edge at the top of the neck lying open, leaving a long end of yarn to later attach this to the head piece.
Head Piece – Beginning at the tip of beak, pull up yarn tightly and with right side of stocking-stitch on the outside, sew across row ends as in picture below. Continue along row ends leaving a small gap for stuffing at the cast-on edge. Stuff lightly, then sew across this edge to complete the head piece. Pull up yarn tightly and fasten off.
Facial Features – Backstitch pupils onto the sides of the flamingo head using black yarn; counting the numbers of knitted stitches for the location of each pupil to keep your design symmetrical.
Flamingo feet – Place two foot pieces back to back, with wrong side of stocking stitch together. Oversew cast on edges together, and then along each of the row ends and the cast-on edge. Fasten off loose ends.
Flamingo Legs – Lay out leg piece horizontally and fold over cast-off edge towards the purl side of st-st. Roughly sew or tack this edge to the centre of the leg piece, catching it all the way down the middle of the leg. (You could pin it first if you would find this easier.) Then roll the cast on edge over this (effectively like a long swiss roll) and sew this neatly down the full length of the leg.
Flamingo Completion – Sew one end of the first completed leg to the top of the completed foot, and then sew the other end to the underside of the completed flamingo body. This position should only be a few knitted stitches away from the seam. Complete your flamingo by attaching the second leg to the other foot piece, and sew the top of this leg piece to the underside of the flamingo body equidistant from the seam as the other leg. Pin the cast-off edge of the open flamingo neck to the back/underside of the completed flamingo head. Once happy with positioning, sew into place. Fasten off all loose ends, ensure any pins are removed, and she is complete!

Knitted Flamingo Feet
Making their Day…
The best bit is in the giving! Carefully wrap your flamingo in some tissue paper or nestle him in a box of shredded paper. Pop in a gift bag and hand to your delighted recipient. In this case – Happy 5th Birthday Poppy!
Make it Different…
As well as coming up with your choice for breed of flamingo and changing the colours accordingly, you may choose to personalise it further by adding some extra detailing. (Not included in timings). Give her some sprouts of hair on the top of her head, or add some stitching a name or age number to the side of the body for example. Other detailing can personalise it such as the small buttock stars seen in the knitted unicorn.
And don’t forget this flamingo can be adjusted to make it a little smaller – see the little knitted flamingo or have a go yourself by knitting fewer rows for the neck or fewer cast-on stitches for the leg pieces. That could always be a baby for this mummy flamingo!

Behind the Scenes!
These patterns are all made up as I go along, learning from mistakes along the way. Every time I create a new pattern, I record it in the Updates part of this site (effectively my blog…) There is a story behind each creation, and this can help give you some more ideas and encouragement. See the Update info….
All done?
Feel free to share your successes or any other tips or suggestions by contacting me. If it’s all gone swimmingly and you’re ready for your next challenge, have a look at what to try next!
Looking for Free Stuff?
Check out freebies here.... FREE STUFF! Or sign up to my MAILING LIST! for offers, updates and even more freebies!