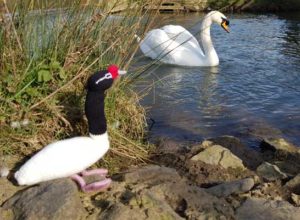
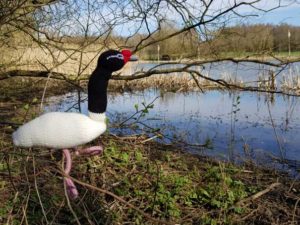
How to Knit a Black-Necked Swan
Complete Size – 21 cm width x 31 cm height
What you will need…
Total time – 6 hours 50 minutes Each Knitted Swan (as shown)
3.25mm knitting needles (UK 10, US 3)
Double knitting yarn – Colours according to the breed of swan
Black-necked swan – White, black, red, grey, pink
Sewing up needle
Scissors
Toy filling/stuffing
Craft Pipe cleaners (26cm total length minimum or 2 x 13cm lengths)

Before You Start…
Abbreviations
K = Knit P = Purl St = Stitch Sts = Stitches
St-st = stocking stitch. Alternating a row of knit stitches (right side), with a row of purl stitches (wrong side).
K2tog = Decrease by knitting two stitches together, making one stitch from two.
Inc = Increase – by knitting into the front and the back of the same stitch, to make two stitches out of one.
Sl2tog – Slip two stitches together from the left needle to the right
p2sso – pass two slipped stitches over (over the knitted stitch)
Cast On – I use the thumb method
Cast off – K wise or P wise according to pattern. US – bind off
B&T tightly – Using sewing up needle, thread yarn through all remaining stitches
TOP TIP
This pattern shows the black-necked swan breed, but you may vary the yarn colour to suit your own choice of swan. Click here for the mute swan. You may wish to consider darker-coloured breeds if your knitted swan is a gift for children.
How to Make it…
Made from one knitted body piece, one neck piece, one head and beak piece, two leg pieces and four small knitted pieces to make up the two feet. One extra knitted piece is needed to form the lump at the top of the beak (basal knob). All pieces are sewn together and stuffed, with added stitching for the eye features.
Body Piece
Make 1
Time – 1 Hour 55 Minutes Each Piece
Piece Size 21 cm long x 25 cm wide (body circumference)
Needles 3.25 mm
Yarn Colour White
Begin at tail end and cast on 16 sts
G-st 2 rows
Beginning with a K row, st-st 4 rows
Next row (K1, Inc Kwise) to the end (24sts)
Beginning with a P row, st-st 7 rows
Next row (K2, Inc Kwise) to the end (32sts)
Beginning with a P row, st-st 7 rows
Next row K2, (Inc Kwise, K2) to the end (42sts)
Beginning with a P row, st-st 21 rows
Next row K2, (K2tog, K2) to the end (32sts)
Beginning with a P row, st-st 7 rows
Next row (K2, K2tog) to the end (24sts)
Beginning with a P row, st-st 13 rows
Next row (K1, K2tog) to the end (16sts)
P 1 row
Next row K2tog to the end (8sts)
B&t tightly
Neck Piece
Make 1
Time – 50 Minutes Each Piece
Piece Size 13 cm Length x 12 cm width (neck circumference)
Needles 3.25 mm
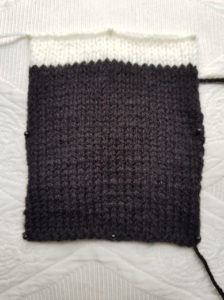
Yarn Colours White & Black
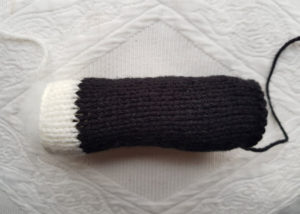
If knitting a black-necked swan, begin with white yarn
Cast on 24 stitches
Beginning with a K row, st-st 6 rows
Break off yarn and join on black yarn
Continue in st-st 30 rows
Cast off Kwise
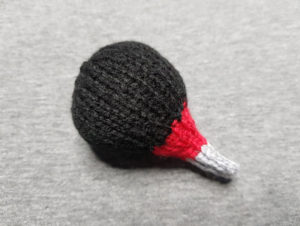
Head Piece

Make 1
Time – 45 Minutes Each Piece
Piece Size 10 cm length x 15 cm width (head circumference)
Head diameter 6cm made-up
Needles 3.25 mm
Yarn Colours Grey, Red & Black
Begin at the tip of the beak, cast on 4 sts in desired colour (grey for black-necked swan)
P 1 row
Inc Kwise into every st (8 sts)
Beginning with a P row st-st 5 rows
Break off yarn and join on red
Beginning with a K row, st-st 4 rows
Next row Inc Kwise into every st (16sts)
Beginning with a P row st-st 3 rows
Break off yarn and join on black as required for main head
Next row (K1, Inc Kwise) to the end (24sts)
P 1 row
Next row (K2, Inc Kwise) to the end (32sts)
Beginning with a P row, st-st 11 rows
Next row (K2, K2tog) to the end (24sts)
P 1 row
Next row (K1, K2tog) to the end (16sts)
P 1 row
Next row K2tog to the end (8sts)
B&t tightly
Basal Knob

Make 1
Time – 10 Minutes Each
Piece Size 3 cm width x 3 cm height
Needles 3.25 mm
Yarn Colour Red
Begin at the beak end and cast on 4sts
Inc Kwise into every st (8sts)
Beginning with a P row st-st 7 rows
Next row K2tog to end
B&t tightly
Legs
Make 2
Time – 10 Minutes Each
These are knitted from side to side (across the leg) rather than top to bottom.
Piece Size 7 cm width x 3 cm height (1cm leg diameter when made up)
Needles 3.25 mm
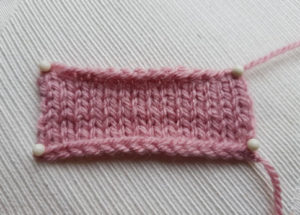
Yarn Colour Pink
Cast on 16 sts
Beginning with a P row, st-st 7 rows
Cast off
Feet

Make 4
Time – 20 Minutes Each
Piece Size 6 cm x 6 cm
Needles 3.25 mm
Yarn Colour Pink
Cast on 19sts
Beginning with a K row st-st 2 rows
K8, (Sl2tog, k1, p2sso), K8 (17 sts)
P1 row
K7, (Sl2tog, k1, p2sso), K7 (15 sts)
P1 row
K6, (Sl2tog, k1, p2sso), K6 (13 sts)
P1 row
K5, (Sl2tog, k1, p2sso), K5 (11 sts)
P1 row
K4, (Sl2tog, k1, p2sso), K4 (9 sts)
P1 row
K3, (Sl2tog, k1, p2sso), K3 (7 sts)
P1 row
K2, (Sl2tog, k1, p2sso), K2 (5 sts)
P1 row
Cast off
Piece it Together…
Sewing-up time – 70 Minutes as shown

Sewing Up
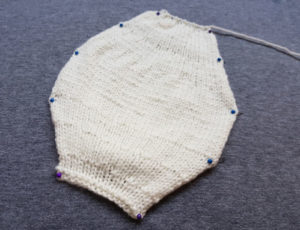
Body Piece – With right side of stocking-stitch on the outside, begin at B&t end of the body and work along oversewing row ends (mattress-stitch for a neater finish), leaving open at the cast-off edge. Stuff lightly as you work along with toy filling.
On completing the row ends, ensure the swan body is filled to a diameter of approximately 24cm (9.5 inches). Then, catch the edge of these row ends to the centre of the cast-on edge, and sew across these cast-on stitches to form the flattened tail-end of the swan. (See picture). Fasten off all loose ends.

Swan Neck – Working from one end of the neck to the other, oversew row ends to complete a tube, leaving both the cast on and cast off edges open. Ensure you switch the yarn to keep the colour consistent with the neck colour. Mattress stitch gives a more seamless finish, ideal for the neck where the seem would be visible from all angles. Do not stuff at this point.

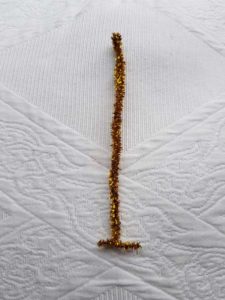
For a Bendy Neck – Start with a length of pipecleaner roughly double the length of your knitted swan neck (approximately 26 cm). Fold it over in half, twist along this new length and then flip up the two separate ends as in the picture. Fold these two ends again, back on themselves, to ‘soften’ the wire ends, so that it doesn’t poke through your final piece. Leave these short ends of the pipecleaner lying slightly off the main length of pipecleaner to allow them to work like a bit of a ‘hook’ and reduce the chance of it moving around inside the neck. Place this pipecleaner centrally inside the knitted swan neck and stuff lightly around it, covering all ends.

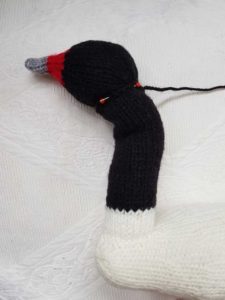
Completing the Neck – Pin the open end of the lower part of the neck to the top of the curved front end of the swan body as in the picture. Sew into place and fasten off loose ends. Leave this body/neck part aside while the head is completed.
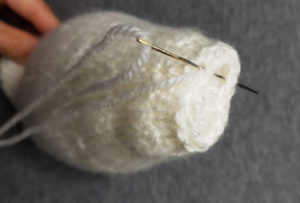
Swan Head – Begin at tip of the beak, gather up cast on stitches and begin to oversew row ends leaving a small gap in the seam at the back of the head. Use this gap to stuff lightly, then pull up B&t tightly, close gap and fasten off loose ends. Pin the cast off edge of the open swan neck to the back/underside of the completed swan head. Once happy with positioning, sew into place.
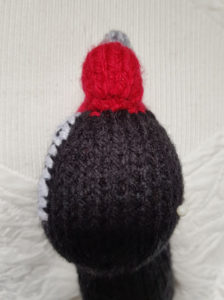
Sewing Basal Knob – Pin the basal knob piece centrally above the beak, aligning cast on and cast off edges with the colour changes of the beak. (See picture.) Sew three sides into place, then stuff very lightly before sewing the final edge. Fasten off loose ends.
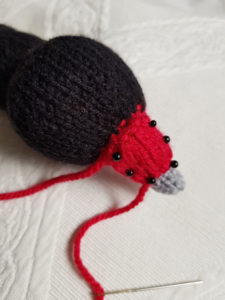

Swan Eye Features – Using the photos for guidance use white yarn to stitch on the eyes/facial markings of the black-necked swan. Use pin heads to mark the end of where the markings come back to, ensuring they sit symmetrically on either side of the swan head. Use two lengths of yarn together to form a thicker yarn and begin at the pin. Oversew one knitted stitch at a time working horizontally across the head towards the beak. When four knitted stitches away from the beak colour continue this stitching but split into two with a clear knitted-stitch free between the white eye-stitching to form the eye space. When complete, this eye feature sewing for the black-necked swan should be around 3.5cm to 4cm in length.

Swan feet – Place two foot pieces back to back, with wrong side of stocking stitch together. Oversew cast on edges together, and then along each of the row ends and the cast on edge. Fasten off loose ends.


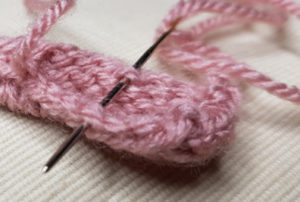
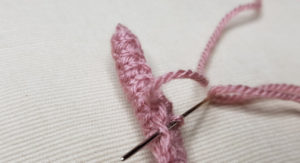
Swan Legs – Lay out leg piece horizontally and fold over cast off edge towards the purl side of st-st. Roughly sew or tack this edge to the centre of the leg piece, catching it all the way down the middle of the leg. (You could pin it first if you would find this easier.) Then roll the cast on edge over this (effectively like a long swiss roll) and sew this neatly down the full length of the leg (as seen in pictures).

Swan Completion – Sew one end of the first completed leg to the top of the completed foot, and then sew the other end to the underside of the completed swan body. This position should only be a few knitted stitches away from the seam. Complete your swan by attaching the second leg to the other foot piece, and sew the top of this leg piece to the underside of the swan body equidistant from the seam as the other leg. Fasten off all loose ends and he is complete!
Make it Different…
Colours required for your knitted swan will depend on your breed of choice. There are some slight pattern differences as above if you wish to stick as close as possible to the real thing. Some of these may look a little odd (such as the basal knob) so you could choose to keep the simpler basic pattern. Children may not be fussed if it is not anatomically correct and it also makes things a little quicker.

Behind the Scenes!
These patterns are all made up as I go along, learning from mistakes along the way. Every time I create a new pattern, I record it in the Updates part of this site (effectively my blog…) There is a story behind each creation, and this can help give you some more ideas and encouragement. See the Update info….
All done?
Feel free to share your successes or any other tips or suggestions by contacting me. If it’s all gone swimmingly and you’re ready for your next challenge, have a look at what to try next! My next pattern!