How to Knit a Caterpillar
Complete Size - 8cm width x 8cm height x 35cm length
What you will need...
Total time - 5 Hours 15 Minutes Each Knitted Caterpillar
3.25mm knitting needles (UK 10, US 3)
Double knitting yarn - several desired colours
Buttons (assorted to preference)
Sewing up needle
Scissors
Stuffing / toy filling

Before You Start...
Abbreviations
K = Knit P = Purl St = Stitch Sts = Stitches
Cast On - I use the thumb method.
St-st = stocking stitch. Alternating a row of knit stitches (right side), with a row of purl stitches (wrong side).
Inc = Increase - by knitting into the front and the back of the same stitch, to make two stitches out of one.
K2tog = Decrease by knitting two stitches together, making one stitch from two.
Cast off - P wise. US - bind off.
B&t tightly - Break off yarn and thread yarn through the remaining stitches on needle, pull up tightly and fasten off.
TOP TIP
If sewing isn't your strong point, these little buttons with their choking hazard should obviously be avoided for small children. They're also not the comfiest to cuddle for babies. Leaving the caterpillar plain or using fabric numbers is probably a better bet.
Vary colours to your preference, and vary the length by adding extra segments to the body piece.
How to Make it...
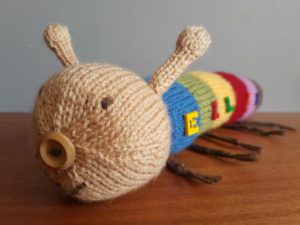
Made from four knitted pieces - the head piece, two antennae, and a long single body piece made of 5 coloured segments and the rear end. There are 5 finger-knitted pieces which help to form his 10 legs. All pieces are sewn together with added decorative side buttons, a nose button and sewn-on facial features.
Body Piece

Make 1 for Each Caterpillar
Time - 3 Hours Each Piece
Size 27 cm
Needles 3.25 mm
Yarn Blue (or as per preference)
Cast on 32sts
*Next row P
Next row K5 (Inc Kwise, K2) 8 times, K3 (40sts)
Beginning with a P row st-st 11 rows
Next row K5, (K2tog, K2) 8 times, K3, break off yarn and join next colour**
Repeat pattern from * to ** 4 further times to make a total of 5 body segments, then continue as follows to form the bottom end of your caterpillar.
In colour required for his bottom P 1 row
Next row K5 (Inc Kwise, K2) 8 times, K3 (40sts)
Beginning with a P row st-st 7 rows
Next row K9, K2tog twice, K14, K2tog twice, K9 (36sts)
P 1 row
Next row K8, K2tog twice, K12, K2tog twice, K8 (32sts)
P 1 row
Next row (K2, K2tog) to the end (24sts)
P 1 row
Next row (K1, K2tog) to the end (16sts)
P 1 row
Next row K2tog to the end (8sts)
B&t tightly
Head Piece

Make 1 for Each Caterpillar
Time - 30 Minutes Each
Size 9 cm
Needles 3.25 mm
Yarn Pale Brown/Fawn
Cast on 32sts
P 1 row
Next row K5 (Inc Kwise, K2) 8 times, K3 (40sts)
Next row P
Next row K5 (Inc Kwise, K3) 8 times, K3 (48sts)
Beginning with a P row st-st 11 rows
Next row K11, K2tog twice, K18, K2tog twice, K11 (44sts)
Beginning with a P row st-st 3 rows
Next row K10, K2tog twice, K16, K2tog twice, K10 (40sts)
P 1 row
Next row K9, K2tog twice, K14, K2tog twice, K9 (36 sts)
P 1 row
Next row K8, K2tog twice, K12, K2tog twice, K8 (32sts)
P 1 row
Next row (K2, K2tog) to the end (24sts)
P 1 row
Next row (K1, K2tog) to the end (16sts)
P 1 row
Next row K2tog to the end (8sts)
B&t tightly
Antennae

Make 2 for Each Caterpillar
Time - 10 Minutes Each Piece
Size 4.5 cm
Needles 3.25 mm
Yarn Light Brown/Fawn
Cast on 6sts
Beginning with a K row st-st 10 rows
Next row inc Kwise into every st (12sts)
Beginning with a P row st-st 3 further rows
Next row K2tog to end (6sts)
B&t tightly
Legs

Make 5 for Each Caterpillar
(Each piece makes a pair of legs, forming a total of 10 legs)
Time - 5 Minutes Each
Size 13 cm
Needles not needed
For thicker legs, you may wish to use chunky wool, but I have used three lengths of yarn together.
Cut three lengths of yarn to around 90cm, placing them together.
Finger-knit from one end to your desired length.
Depending on your tension, 90cm of triple regular yarn will result in finger-knitted lengths of up to around 13cm.
With both ends of your finger knitting fastened off, cut the yarn ends leaving approximately 1cm ends hanging freely to form 'toes'.
Piece it Together...

Lettering
You may wish to leave your caterpillar plain, but adding the lettering at this point (before the caterpillar is sewn up) will allow you to fasten off loose ends more easily, hidden within the caterpillar.
I have sewn on buttons positioned a quarter of the way from the edge of the body piece to allow the completed letters to lie directly on the side of the caterpillars body when made up.


Body Piece
Beginning at the caterpillars rear end (brown), oversew row ends down the length of the body piece, with right side of stocking-stitch on the outside. Sew up each segment in the co-ordinating colour by using the broken off yarn ends of each segment. Mattress stitch will leave a nice neat finish.
Begin stuffing the caterpillar one segment at a time to allow a more even filling.
Leave neck open at this stage.


Head & Antennae
Beginning at the B&t 'nose' end of the head piece, and with the right side of stocking stitch on the outside, oversew row ends down the full length of the head piece.
Facial features, including a decorative button for his nose, may be sewn on at this point to allow fastening off of loose ends more discretely. Eyes are sewn and positioned symmetrically, 2 clear knitted rows above where the 'decrease' knitted rows commence.
With facial features in place, then stuff the head firmly to give it a full shape, leaving neck open at this stage.
For the antennae, oversew row ends of the knitted pieces with right side of stocking stitch on the outside, adding stuffing as you go.
Position antennae to either side at the top of the head symmetrically, as shown, and sew into place.
Oversew the cast-on stitches of this completed head piece to the cast-on stitches of the body piece. Fasten off loose ends.


And Lastly the legs...
Fold the finger knitted legs in half (as seen in photo) to find the centre, and attach this point to the centre of each segment, at the point where row ends are sewn together.
Ensure if any pins are used that they are removed when complete. And there you have your finished cheerful chappy!


Make it Different...
Choose your own colours and lettering/numbers to make him a little individual. Try different button noses, or even choose your own facial expression!
To make the pattern quicker and simpler, the increase and decrease rows at the start and end of each coloured segment may be replaced by simple K rows. This will just result in a smoother body.
Finger knitted legs were my choice for speed and ease but proper little feet might be worth the extra time. (Perhaps use the pattern from the little monster feet, making the legs slightly longer for a caterpillar.)
Makes a perfect knitted toy for a child to cuddle, a nice decoration, or add extra segments to the body for extra length to make a nice characterful knitted draught excluder - but perhaps also using a larger size needle!

Behind the Scenes!
These patterns are all made up as I go along, learning from mistakes along the way. Every time I create a new pattern, I record it in the Updates part of this site (effectively my blog…) There is a story behind each creation, and this can help give you some more ideas and encouragement.
All done?
Feel free to share your successes or any other tips or suggestions by emailing me. If it's all gone swimmingly and you're ready for you next challenge, have a look at what to try next!
