How to Knit a Cherry Bakewell
Complete Size - 5cm base width x 5cm height, 7.5cm top diameter
What you will need...
Total time - 2 Hours Each Knitted Bakewell
3.25mm knitting needles (UK 10, US 3)
4.5cm Cardboard Circle to firm up the base
Double knitting yarn - light brown, white and red.
Sewing up needle
Toy stuffing / filling
Scissors

Before You Start...
Abbreviations
K = Knit P = Purl St = Stitch Sts = Stitches
Cast On - I use the thumb method.
St-st = stocking stitch. Alternating a row of knit stitches (right side), with a row of purl stitches (wrong side).
K2tog = Decrease by knitting two stitches together, making one stitch from two.
Inc = Increase - by knitting into the front and the back of the same stitch, to make two stitches out of one.
Cast off - P wise. US - bind off.
B&t tightly - Break off yarn and thread yarn through the remaining stitches on needle, pull up tightly and fasten off.
TOP TIP
Don't over-stuff your bakewell as it'll end up being quite poofy at the top rather than a flatter finish.
Depending on how tightly you sew up your bakewell, you may need to adjust the size of the cardboard base to fit.

How to Make it...
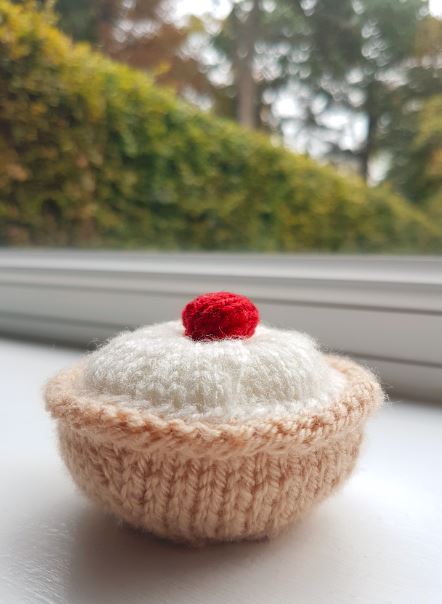
Made from one knitted pastry piece, one knitted icing piece, and a small knitted piece to form the cherry. All pieces are sewn together with a 4.5cm cardboard circle in the base to help support its shape.
Pastry

Make 1
Time - 1 Hour each
Size 8 cm Diameter
Needles 3.25 mm
Yarn Light Brown
Cast on 52sts
Beginning with a K row st-st 2 rows
K5, (K2tog, K11) three times, K2tog, K6 (48sts)
P 1 row
K5, (K2tog, K10) three times, K2tog, K5 (44sts)
P 1 row
K4, (K2tog, K9) three times, K2tog, K5 (40sts)
P 1 row
K4, (K2tog, K8) three times, K2tog, K4 (36sts)
Beginning with a P row st-st 2rows
K 1 row to form bottom rim
Continue to shape the flat bottom...
Next row (K2, K2tog) to end (27sts)
P 1 row
Next row (K1, K2tog) to end (18sts)
P 1 row
Next row K2tog to end (9sts)
P 1 row
B&t tightly
Icing

Make 1
Time - 25 Minutes Each
Size 7cm Diameter
Needles 3.25 mm
Yarn White
Cast on 45sts
Beginning with a P row, st-st 3 rows
Next row (K3, K2tog) to end (36sts)
P 1 row
Next row (K2, K2tog) to end (27sts),
P 1 row
Next row (K1, K2tog) to end (18sts)
P 1 row
Next row K2tog to end (9sts)
P 1 row
B&t tightly
Cherry

Make 1
Time - 5 Minutes Each
Size 2 cm
Needles 3.25 mm
Yarn Red
Cast on 4sts
Inc Knit-wise into every stitch (8sts)
Beginning with a P row st-st 5 rows
Next row K2tog to end
B&t tightly
Piece it Together...
Sewing up Time 30 Minutes

Cupcake Base
Begin to sew up the pastry at the cast off edge, sewing across row ends all the way up to the top edging.
Using a compass draw and cut out a 4.5cm sturdy cardboard circle and push into the bottom of the case.
Fasten off all loose ends.


Top of the Cake
Complete the icing knitted piece, by oversewing row ends to form the circular shape.
Sew this icing just inside the knitted top edge of the pastry, stuffing the cake lightly as you go. This will bring both cast on edges together.
With the right side of stocking stitch on the outside, oversew row ends of the cherry knitted piece, stuffing the cherry lightly as you go.
Sew the cherry to the top of the cake centrally.
If used, ensure that all pins are removed when completed.


Make it Different...
The top edge of the pastry for this cherry bakewell is a quick and easy rolled edge, however you could use 'yrn' stitching instead, as used for the knitted cupcake pattern. This would give a more frilled edge.
If you fancied something another than a cherry (I've seen some very yummy lemon bakewells), there's always the option of picking another little knitted shape for your topper, such as knitted flowers, knitted hearts or other small knitted pieces from other knitting patterns - just mix and match.
Perfect handmade keepsake or decoration, especially as part of a little cake collection!


Behind the Scenes!
These patterns are all made up as I go along, learning from mistakes along the way. Every time I create a new pattern, I record it in the Updates part of this site (effectively my blog…) There is a story behind each creation, and this can help give you some more ideas and encouragement.
All done?
Feel free to share your successes or any other tips or suggestions by contacting me. If it's all gone swimmingly and you're ready for your next challenge, have a look at what to try next!
